Mottle Round 1
Round 1 introduces players to Mottle's core stealth loop. By understanding the opening spawn geometry, seeker vision parameters, and the power of stationary camouflage, you can clear this stage with zero alert accumulation.
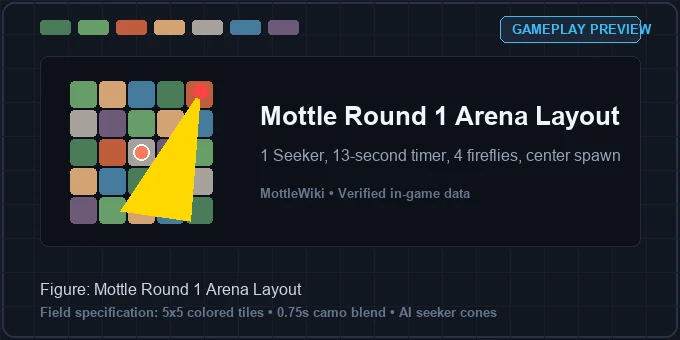
Round 1 Baseline Parameters
The opening stage operates on predictable starter values determined by the game's core progression scaling:
- Seeker Count: Exactly 1 seeker patrolling the arena.
- Seek Countdown: 13 seconds of survival time required to clear.
- Fireflies Spawned: 4 glowing fireflies (+10 points each).
- Seeker Speed: 0.201 world units per second (calculated as 0.19 + 0.011 × 1).
- Vision Cone Range: 0.310 world units (calculated as 0.30 + 0.010 × 1).
With player movement speed fixed at 0.60 world units per second, you move nearly three times faster than the lone seeker in Round 1. Outrunning detection is simple, but moving introduces unnecessary risk.
The HIDE Phase and Center Spawn Geometry
Every Mottle round starts with a mandatory HIDE phase lasting exactly 3 seconds. During this window, all player controls remain locked, and directional inputs are ignored.
The game engine spawns your hider in the exact geometric center of the 5×5 tiled grid. Simultaneously, the lone seeker spawns at a radial distance of 0.40 world units away from your position, angled directly toward your character.
Because the seeker faces inward, its yellow vision cone points straight at the central tile where you stand. Novice players often panic during this sequence, frantically dragging controls the split second the 3-second HIDE timer expires. Doing so breaks camouflage and causes instant detection.
The Golden Opening Rule: Stand Motionless for 1 to 2 Seconds
When the 3-second HIDE phase finishes and the 13-second SEEK phase begins, do not touch your screen or keyboard. Stay completely motionless for the first 1 to 2 seconds.
Because you have remained stationary throughout the 3-second freeze, your camouflage rating is 1.0 (100% full camouflage). Your character color matches the central floor tile exactly, reducing your visibility to 0.0.
The game engine requires visibility to exceed the critical 0.10 threshold before any alert can accumulate. Even though the seeker's vision cone illuminates you from 0.40 units away, your alert meter remains at 0%. Within 1 to 2 seconds, the seeker begins its first patrol waypoint or scan cycle, rotating its vision cone away from the center.
Collecting the Four Fireflies
Once the seeker turns its back and begins moving along its patrol route, you have a generous window to collect the 4 fireflies distributed around the arena.
Steer toward nearby fireflies using keyboard keys or touch controls. When you pass within 0.055 units of a firefly, your character absorbs it, adding +10 points to your score. Collecting all 4 fireflies provides +40 points.
Always monitor the seeker's state. When the seeker reaches a waypoint, it has a 55% chance to pause and perform a 1.7-second scan sweep, expanding its cone to 109 degrees. If you see the seeker stop moving, release controls immediately to restore full camouflage before the sweep reaches you.
Clearing Round 1 and Round Bonus
When the 13-second timer expires, the round terminates immediately. Surviving Round 1 grants a +100 point clear bonus, which combines with your firefly pickups for a typical opening score of 140 points.
Preparing for Round 2 requires recognizing that the game will add a second seeker immediately. Review our guide on How Camo Works to master the motionless defense, check the Scoring Guide for point scaling, or explore How to Play for complete control options.